
Asphalt Crack Repair Before Winter – Why Timing Matters, Products, Techniques
According to the Asphalt Institute, water infiltration through untreated cracks causes up to 75% of pavement failures. If you’ve noticed cracks forming in your driveway, you’re facing a ticking clock as temperatures drop. The freeze-thaw cycle can transform minor surface damage into costly structural problems within a single winter season. Understanding when to act, which products to choose, and how to apply them correctly could save you thousands in repairs.
Understanding the Freeze-Thaw Cycle and Its Impact on Asphalt
When temperatures drop below freezing, any water that has seeped into your asphalt’s cracks begins a destructive process that can quickly turn minor damage into major repairs.
Water expands by approximately nine percent when it freezes, generating tremendous hydraulic pressure within those cracks. This force widens existing fissures and creates new fracture points throughout the pavement structure.
As temperatures rise, the ice melts and the water penetrates deeper into the compromised substrate. Each subsequent freeze-thaw cycle amplifies the damage exponentially.
You’ll notice cracks spreading laterally and connecting with adjacent weaknesses, forming the characteristic “alligator” pattern that signals structural failure.
Understanding this cycle empowers you to act strategically. By sealing cracks before winter arrives, you’re eliminating the entry point that initiates this destructive cascade, preserving your pavement’s integrity and extending its functional lifespan.
Signs Your Driveway Needs Crack Repair Before Winter
Before winter’s harsh conditions set in, you’ll want to inspect your driveway for telltale warning signs that demand immediate attention.
Look for linear cracks exceeding a quarter-inch in width—these allow moisture penetration that accelerates deterioration during freeze-thaw cycles.
Cracks wider than a quarter-inch are winter’s open invitation—seal them before freeze-thaw cycles turn hairline fractures into costly repairs.
Alligator cracking, characterized by interconnected fractures resembling reptile skin, indicates structural compromise beneath the surface.
Don’t ignore edge cracking along your driveway’s perimeter, as these vulnerable areas deteriorate rapidly when exposed to winter moisture.
Watch for depressions or settling where water pools after rain. Standing water signals drainage issues that’ll worsen exponentially once temperatures drop.
Examine areas where vegetation has emerged through cracks—roots create pathways for water infiltration.
If you notice faded, gray coloring or surface raveling where aggregate loosens, your asphalt’s protective binder has degraded, leaving it susceptible to accelerated winter damage.
Ideal Temperature and Weather Conditions for Asphalt Repairs
Although you might feel tempted to tackle asphalt crack repairs at any time, temperature plays a critical role in determining whether your efforts will succeed or fail. Most crack sealants require ambient temperatures between 50°F and 85°F for best adhesion and curing. Below this range, the material won’t bond properly; above it, you’ll encounter premature setting and poor penetration.
You’ll also need dry conditions for at least 24 hours before application. Moisture trapped beneath sealant creates adhesion failure and accelerates deterioration. Check weather forecasts carefully—unexpected rain within 24 hours post-application can wash away uncured material.
The ideal repair window typically falls in early-to-mid autumn when temperatures remain moderate and precipitation decreases. This timing allows sufficient curing before freeze-thaw cycles begin compromising your pavement’s structural integrity.
Types of Asphalt Cracks and How to Identify Them
Understanding what type of crack you’re dealing with helps you choose the right repair method and materials for lasting results.
Identifying your crack type first ensures you select the exact repair approach that delivers permanent results.
Linear cracks run in straight lines, typically following the pavement’s length or width. You’ll find these along seams or where thermal expansion has stressed the surface.
Alligator cracking displays interconnected patterns resembling reptile skin, signaling base failure or structural issues beneath the surface layer.
Edge cracks form along pavement margins where inadequate support or drainage problems exist.
Block cracks create large, rectangular sections and indicate binder aging or poor-quality asphalt mix.
Pothole precursors appear as circular depressions where multiple crack types converge.
Assess crack width and depth using a ruler or crack gauge. Cracks under half-inch wide require different products than wider gaps needing more robust filling compounds.
Best Crack Repair Products for DIY Homeowners
Three main categories of crack repair products dominate the DIY market, each designed for specific crack widths and conditions.
Liquid Pour Fillers
You’ll find these asphalt emulsion products ideal for cracks under half an inch wide. They self-level, cure quickly, and require minimal tools.
Apply directly from the bottle for hairline fractures and narrow linear cracks.
Caulk-Style Sealants
For cracks between half an inch and one inch, rubberized asphalt caulk delivers superior flexibility.
You’ll need a standard caulk gun, but you gain precise application control and excellent adhesion that withstands freeze-thaw cycles.
Cold-Patch Compounds
When addressing cracks exceeding one inch or small potholes, cold-patch asphalt provides structural repair.
Tamp it firmly into the damaged area, compacting until level with the surrounding surface.
This product handles the most severe damage DIY homeowners typically encounter.
Professional-Grade Sealants and When to Use Them
While DIY products handle most residential crack repairs effectively, professional-grade sealants offer distinct advantages for demanding situations.
Hot-applied rubberized asphalt requires specialized melting equipment but delivers superior adhesion and flexibility that withstands extreme temperature cycling. You’ll want these products when repairing cracks exceeding one inch in width or depth.
Consider professional-grade options when your driveway experiences heavy vehicle traffic or existing repairs have failed repeatedly. These sealants penetrate deeper into crack structures and maintain elasticity longer than consumer alternatives.
Commercial-grade cold-pour sealants bridge the gap between DIY and hot-applied products. They’re accessible without specialized equipment while offering enhanced durability.
Reserve these for high-stress areas like driveway entrances where turning vehicles create additional wear on standard repairs.
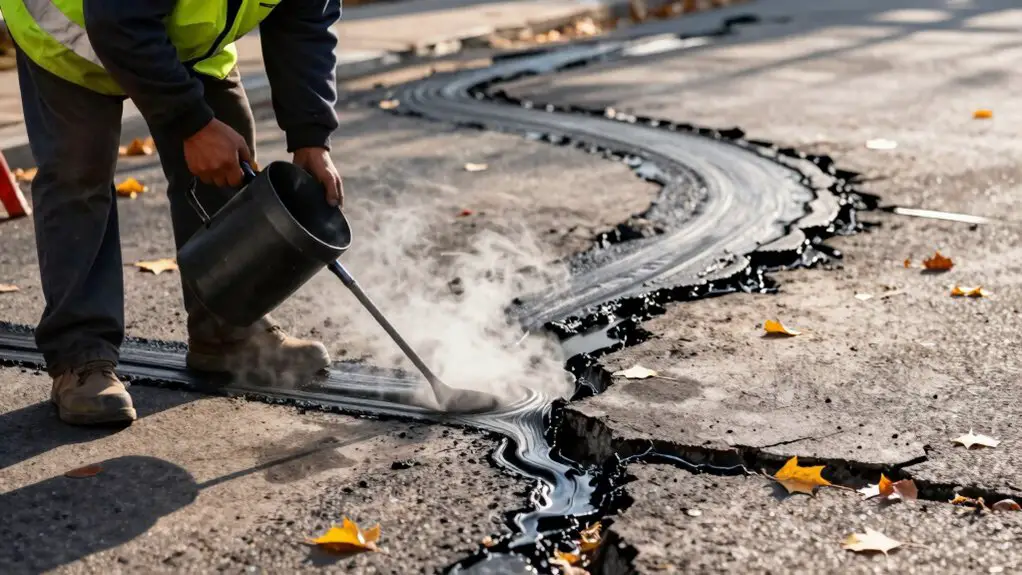
Step-by-Step Techniques for Effective Crack Sealing
Five essential steps separate lasting crack repairs from fixes that fail before spring arrives.
First, clean debris from cracks using a wire brush or compressed air—contaminants prevent proper adhesion.
Clean every crack thoroughly before sealing—debris and contaminants are the hidden enemies of lasting repairs.
Second, widen narrow cracks to at least a quarter-inch using a crack chasing blade, creating ideal surface area for sealant bonding.
Third, apply backer rod into cracks deeper than half an inch; this prevents sealant waste and guarantees proper cure depth.
Fourth, install your chosen sealant using a pour pot or caulk gun, slightly overfilling to account for settling.
Finally, smooth the surface with a squeegee or trowel, feathering edges to create seamless shifts.
You’ll achieve professional results by allowing full cure time—typically 24 to 48 hours—before exposing repairs to traffic or moisture.
Maintenance Tips to Protect Your Asphalt Through Winter
Once your crack repairs have fully cured, protecting that investment through winter’s harsh conditions becomes your next priority.
Apply a quality sealcoat before temperatures drop below 50°F to create a protective barrier against moisture, salt, and freeze-thaw cycles.
You’ll want to clear snow promptly using plastic-edged shovels rather than metal blades that gouge repaired surfaces.
Limit your use of rock salt and chemical deicers, which accelerate asphalt deterioration. Sand or kitty litter provides traction without the corrosive effects. When you must use deicers, choose calcium magnesium acetate—it’s gentler on asphalt surfaces.
Conduct monthly inspections throughout winter to catch new cracks early.
Address any water pooling immediately; standing water that freezes expands and compromises your repairs.
These proactive measures extend your asphalt’s lifespan considerably beyond reactive maintenance approaches.