You’ve probably stared at that pile of scrap metal in your garage, wondering if you could turn it into something useful. The truth is, welding at home doesn’t require years of experience or expensive materials to create functional pieces that’ll actually improve your daily life. Whether you’re looking to organize your workspace or add character to your living room, these ten projects will challenge your skills while delivering practical results that justify the time spent perfecting each weld.
Welding Practice Jig for Skill Development

Building a welding practice jig transforms your skill development from frustrating guesswork into consistent, measurable progress. You’ll find that having a reliable setup eliminates alignment errors and lets you focus on perfecting your technique rather than wrestling with positioning.
Start with simple materials like steel or aluminum, depending on your project needs. Use your MIG welder for efficiency or TIG for precision work. Don’t forget essential tools like grinders, drills, and measuring equipment.
Design your jig based on what you’re practicing—whether it’s a basic frame jig for flat pieces or a magnetic jig for smaller parts. Consider building temporary jigs from scrap materials for single practice sessions or more permanent fixtures if you plan to repeat specific exercises regularly. Test for accuracy before committing to extended practice sessions.
With proper safety gear and a clean workspace, you’ll develop muscle memory faster while producing consistently better welds.
Magnetic Tool Holder for Workshop Organization
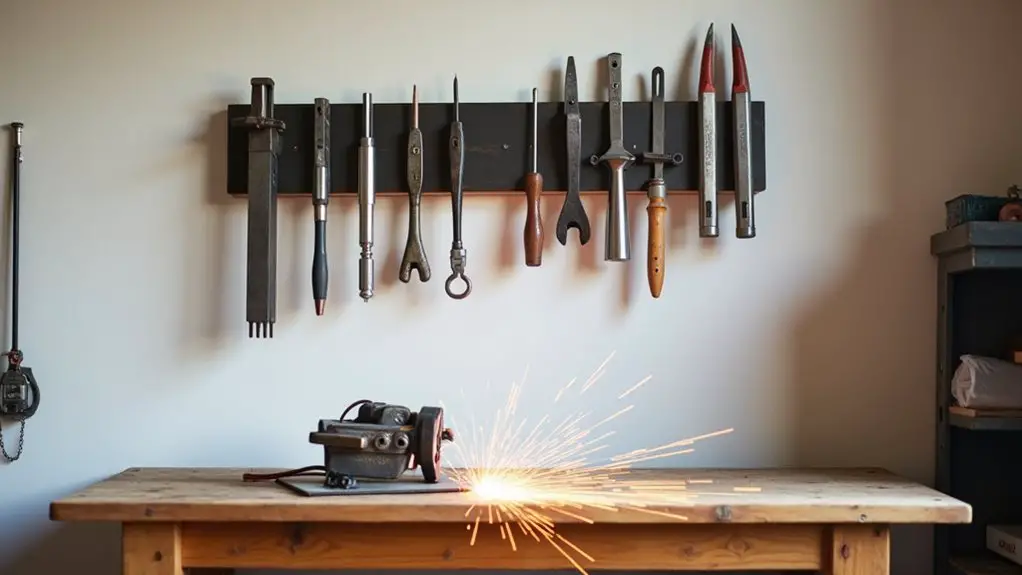
A well-organized workshop amplifies your welding productivity, and you’ll discover that scattered tools slow down every project.
Creating a magnetic tool holder transforms your workspace into an efficient haven where every screwdriver, wrench, and plier has its designated spot.
A magnetic tool holder creates an organized workspace sanctuary where every essential tool finds its perfect home within easy reach.
Start by measuring your tools and selecting neodymium magnets strong enough to secure them safely. Mount the magnets on a sturdy backing—wood or metal works perfectly.
Position heavier tools near the center and group similar items together for intuitive access.
Install your holder at arm’s reach height, ensuring it’s level and properly fastened. Use a 5mm forstner bit to drill precise holes that accommodate your magnets without allowing them to protrude from the surface.
You’ll immediately notice how this simple addition clears your workbench, prevents tool loss, and keeps frequently-used items visible.
Fellow welders will appreciate this smart organizational upgrade that every serious craftsperson needs.
Welding Helmet Holder for Safe Storage

Every professional welder knows the frustration of searching for a misplaced helmet or finding it damaged from improper storage. You’ll solve this problem by building a simple welding helmet holder using 1″ square tubing and flat stock from your scrap pile. The project takes just 10-15 minutes and requires basic drilling, tapping, and welding skills you already possess.
Your holder should position the helmet for easy access while keeping it off benches and floors where it’s vulnerable to damage. Focus on ergonomic placement that won’t obstruct your workspace or create tripping hazards. Start by marking your 2-inch and 5-inch reference points on the material before bending to ensure proper proportions for your helmet hanger design.
Clean your materials with acetone and wire brushing before welding to guarantee strong joints. This simple addition declutters your shop, protects expensive auto-darkening electronics, and keeps you moving efficiently between welding tasks.
Metal Dutch Oven Trivet Using Rebar Scraps
Three simple rebar pieces and ten minutes of welding time transform scrap metal into a durable Dutch oven trivet that’ll serve you for decades of outdoor cooking.
This triangle-shaped design with sturdy legs elevates your Dutch oven for better heat control, making it perfect for campfire cuisine.
Using stick welding (SMAW), you’ll practice fundamental techniques without needing perfect penetration.
The forgiving nature of this project builds confidence while creating something genuinely useful for your outdoor adventures.
Essential elements for success:
- Gather rebar scraps, welding rod, and safety gear before starting
- Create a stable triangle base with three evenly-spaced legs
- Focus on consistent bead placement rather than perfect welds
- Grind rough edges smooth for safe handling around food
You’re joining a community of makers who value practical, handcrafted solutions. The wire wheel attachment on your grinder effectively cleans oxidation and rust from rebar surfaces, revealing clean steel ready for welding.
Welded Metal Fruit Bowl From Horseshoes
Four to six horseshoes transform into an eye-catching fruit bowl that combines rustic charm with practical functionality through basic welding techniques. You’ll need standard steel horseshoes, a MIG or stick welder, and basic cutting tools to create this conversation starter.
Start by grinding away rust and scale from your horseshoes for better weld quality. Arrange them in a circular pattern, overlapping edges to form the bowl’s structure. Tack weld each connection first—this lets you adjust positioning before committing to final welds. Focus your welding on the backside to keep the front looking clean.
After completing your welds, grind away slag and smooth sharp edges. You can paint, powder coat, or seal the finished bowl to prevent corrosion while maintaining that authentic farmhouse appeal. Fast welding helps prevent the base from warping during the final assembly process.
Custom Bike Rack With Quick-Grip Clamps
While store-bought bike racks often lack the perfect fit for your specific space and bicycle collection, building a custom bike rack with quick-grip clamps gives you complete control over dimensions and functionality.
You’ll use 1-1/4 inch steel pipes for horizontal support and 3/4 inch pipes for bike holders, creating a durable foundation that handles everything from road bikes to heavy e-bikes.
Your quick-grip clamps become essential allies during welding, maintaining precise alignment while you tack weld the frame.
Here’s what makes this project rewarding:
- Bend reinforcement bars into protective hooks covered with plastic hose to prevent scratches
- Cross-square your frame constantly to avoid warping and guarantee perfect bike alignment
- Add pivot points for adjustable positioning and maximum storage flexibility
- Prime and paint for weather resistance
This rack design accommodates six bicycles efficiently while keeping them upright and organized in your garage or storage area.
Collapsible Welding Bench for Small Spaces
When your workshop space is at a premium, a collapsible welding bench transforms cramped quarters into a functional metalworking environment.
You’ll love how wall-mount folding tables disappear against garage walls, while leg-folding designs with locking pins provide rock-solid stability when deployed.
Build yours using steel tubing for the frame and quarter-inch steel plate for the surface—materials that’ll handle serious heat and spatter.
Smart design features make all the difference.
Strategic features like stud-spacing compatibility, compact fold depth, and multi-purpose functionality separate amateur builds from professional-grade collapsible welding benches.
You’ll want your bench fitting between standard studs and folding to less than twelve inches deep.
Add casters for mobility, and you’ve got a versatile workstation that serves welding, grinding, and assembly tasks.
The open tube ends naturally function as grounding clamp holders, keeping your electrical connections organized and accessible during projects.
Fellow makers appreciate how these benches maximize every square foot while delivering professional results on a budget.
Steel Stock Rack for Material Organization
Every serious welder knows the frustration of digging through piles of scattered steel stock when you’re ready to start a project.
Building your own steel stock rack transforms that chaos into organized efficiency. You’ll create a stepped design using 1″ square tubing as your frame’s skeleton, with bins decreasing in height from tallest to shortest. A standard 14″ deep by 60″ wide rack fits perfectly between your wall and garage door track.
Design multiple bins with expanded metal flooring to sort materials by size.
Grind all weld areas to bare metal before joining, and practice your technique on scrap first. A Millermatic® 211 MIG welder provides the reliability and precision needed for clean, strong joints throughout the frame construction.
- Cut steel tubing to required lengths using cutoff wheels
- Weld expanded metal sheeting for durable bin floors
- Install adjustable leveling feet for uneven surfaces
- Apply rust-inhibiting coating for long-term durability
Fire Pit Frame for Outdoor Entertainment
Building a custom fire pit frame transforms your backyard into a gathering spot where friends and family naturally converge on cool evenings.
A custom fire pit frame creates the perfect backyard centerpiece for memorable evenings with loved ones.
You’ll want to use ⅛” or 3/16″ steel plates with square tubing for durability. Start by tack welding corner joints to secure your frame, then clean and bevel the square bars before final welding. Install expanded steel grates with crossbars for structural support and proper airflow around logs.
This project typically costs around $40 and takes several hours with basic welding skills. Remember to wear safety gear including gloves, goggles, and a welding helmet. Cut the 45-degree angles on your top frame pieces to ensure proper corner alignment and professional-looking joints.
Use horizontal downhill welding techniques to manage heat effectively. Your finished fire pit creates countless opportunities for outdoor entertainment, from casual conversations to memorable celebrations that bring everyone together.
Coffee Table Metal Legs for Modern Furniture
Two steel flat bars and a handful of rods can transform into sleek, modern coffee table legs that’ll anchor your living space with industrial elegance.
You’ll start by cutting your materials—26″ flat bars and 16″-19″ rods work perfectly. Clean everything with acetone and grind the surfaces smooth for welding. Use scrap wood for marking and cutting your top pieces to ensure precise measurements.
Tack weld your components first, then use vertical down welding along inside corners for cleaner beads. Cross-bracing or V-shaped arrangements give you both structural strength and contemporary style.
Your finishing touches matter most:
- Apply rusty metal primer before your final paint coat
- Grind down rough weld spots for professional appearance
- Pre-drill attachment holes for easy tabletop mounting
- Choose metallic spray finishes for corrosion protection
You’re creating furniture that speaks your design language.
Frequently Asked Questions
What Type of Welding Rod Amperage Is Best for Beginners?
You’ll want 3/32″ E6013 rods at 40-60 amps when you’re starting out. They’re forgiving and create smooth arcs that help you build confidence while learning proper technique and control.
How Much Ventilation Do I Need for Welding at Home?
You’ll need local exhaust ventilation with at least 100 ft/min air velocity across your welding arc. If your space is under 10,000 cubic feet or has low ceilings, add mechanical ventilation for safety.
Can I Use Scrap Metal From Auto Shops for Projects?
While you might worry about quality, auto shop scrap metal’s actually perfect for your projects. You’ll find abundant steel that’s easily weldable, plus it’s environmentally friendly and budget-conscious for fellow makers.
What Safety Equipment Is Required Beyond a Welding Helmet?
You’ll need heat-resistant gloves, fire-resistant clothing, steel-toed boots, and a respirator for fume protection. Don’t forget safety glasses for extra eye protection and guarantee you’re working in a well-ventilated area.
How Do I Prepare Metal Surfaces Before Welding?
Clean your metal thoroughly by removing oil, grease, and rust using solvents or wire brushing. Cut pieces accurately, bevel thick edges, and guarantee you’ve got proper joint fit before welding begins.