
Gutter Guard Installation – Best Types, DIY Tips, and What to Avoid

If you’re tired of climbing a ladder every few months to scoop out soggy leaves, gutter guards can save you real time and effort. But not all guards perform equally, and a poor installation can cause more problems than it solves. From choosing the right type for your roof to avoiding the fastener mistakes that lead to leaks, there’s more to this project than snapping panels into place.
Best Gutter Guard Types for Your Home and Budget
Five main types of gutter guards dominate the market, each with distinct strengths depending on your home’s surroundings and your budget. Understanding the types of gutter guards available puts you in control of your investment.
Mesh gutter guards use stainless steel micromesh to prevent debris while handling heavy rainfall. Screen gutter guards feature larger holes that block bigger debris, though they need snug fitting. Foam gutter guards offer a budget-friendly option but require replacement every 1-2 years. Reverse-curve gutter guards channel water efficiently, yet they demand professional installation for proper shingle integration. Brush gutter guards suit DIY gutter guard installation best, though they’ll struggle with pine needles.
You’ll want to match your choice to your environment, maintenance tolerance, and budget for maximum protection.
How to Prepare Your Gutters Before Installation
Proper gutter preparation makes the difference between guards that perform well and ones that cause problems down the line. Start by taking full command of your gutter system with a thorough inspect and clean routine. Remove all debris, flush with water, and confirm strong flow through every section.
- Check your downspouts for clogs and verify they’re at least 2×3 inches to handle water capacity during heavy storms.
- Verify your gutter pitch sits at roughly ¼ inch per 10 feet, making adjustments to hangers as needed for proper drainage.
- Secure all components by tightening screws, brackets, and seams so nothing shifts after installation.
These steps give you total control over your system’s performance before a single guard goes on.
How to Install Gutter Guards Step by Step
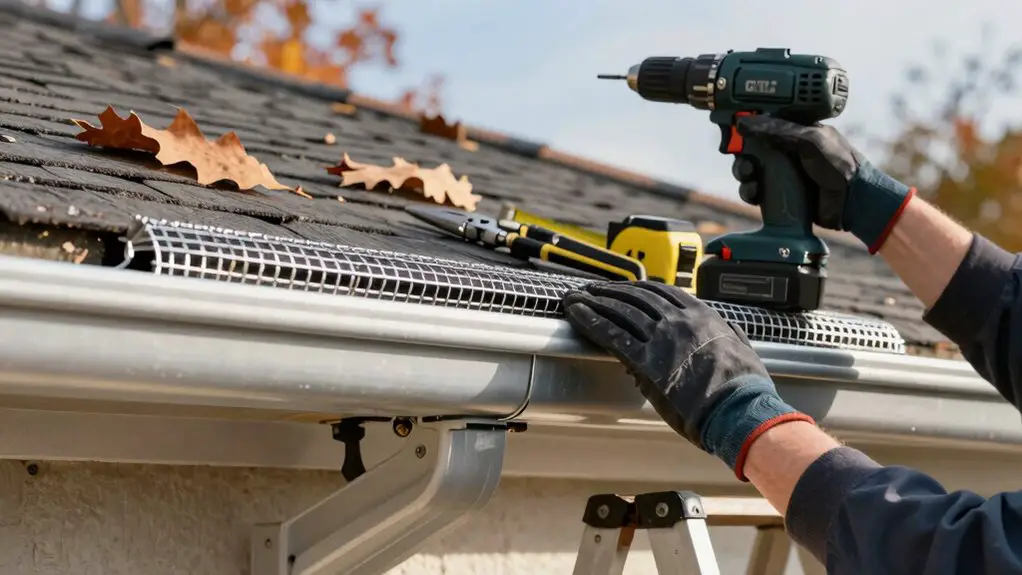
Tackle your gutter guard installation with a clear plan, and you’ll have a system that keeps debris out for years. Gather your tools and materials first, then clean your gutters thoroughly to guarantee proper water flow. Measure each section and cut the gutter guards to size, allowing overlap at joints per manufacturer specs.
For mesh guards, attach them to the gutter edge with recommended fasteners. Avoid screwing into roofing materials, which is one of the most common mistakes during DIY installation. For foam types, press them snugly into place. Once everything’s positioned, confirm secure fastening and alignment along every run. Finally, test the system by running water through it to catch drainage problems before they lead to clogged gutters down the line.
10 Installation Mistakes That Cause Leaks and Damage
Even when you follow the right steps, a few common mistakes during gutter guard installation can lead to leaks, water damage, and costly repairs. Skipping a pre-inspection means sagging gutters and damaged fascia go unaddressed, worsening drainage issues after installation.
Skipping a pre-inspection before installing gutter guards can turn minor drainage issues into costly water damage.
Here are three installation mistakes you must avoid:
- Using improper fasteners. Choosing non-corrosion-resistant fasteners introduces structural weakness and eventual system failure. Always use stainless steel options that secure guards to existing gutters, not the roof.
- Neglecting sealant at seams. Failing to apply gutter-grade silicone or polyurethane sealant at joints and mitered corners creates persistent leaks.
- Choosing incompatible guard styles. Guards that don’t match your gutter type amplify debris problems and reduce drainage efficiency.
Avoiding these errors protects your investment and keeps water flowing correctly.
DIY Gutter Guard Installation vs. Hiring a Pro
How do you decide whether to install gutter guards yourself or bring in a professional? DIY gutter guards work best when you choose a type of gutter guard known for ease of installation, like mesh or foam options. You’ll save on labor costs and control the installation process directly. However, safety risks on high or steep roofs make professional installation the smarter move for many homeowners.
Professionals deliver gutter protection that’s effective at keeping debris out while meeting industry standards. Their work often includes warranties covering materials and workmanship, giving you peace of mind. DIY mistakes can lead to leaks and costly repairs that erase any initial savings. If your roof is complex or you’re unfamiliar with the tools involved, hiring a pro protects your investment.
Seasonal Inspection and Maintenance Checklist
Once you’ve got your gutter guards in place, regular inspections keep them performing at their finest. A solid seasonal inspection and maintenance checklist gives you full control over your system’s longevity. Check your gutter guards twice a year—late fall and early spring—and after every major storm.
- Debris accumulation and water flow: Clear any buildup and confirm water flows freely through downspouts without backflow.
- Fasteners and alignment: Tighten loose fasteners, eliminate gaps or uplift, and verify the pitch sits at ¼ inch per 10 feet for ideal drainage performance.
- Damage assessment: Look for rust, cracks, or wear that demand immediate repairs or replacement.
This checklist guarantees you catch problems early, protecting your investment and maintaining peak gutter performance year-round.