
Heated Roof Cables Installation – When Worth It, DIY Vs Professional
Most homeowners don’t realize that improperly installed heated roof cables can actually increase ice dam formation by creating uneven melt patterns. You’re likely considering this investment because you’ve dealt with water damage or dangerous icicles, but the decision between DIY and professional installation isn’t as straightforward as your roof’s pitch. The wrong choice could cost you more than the ice dams themselves—and there’s one critical factor most guides won’t tell you.
Understanding How Heated Roof Cables Work
Heated roof cables operate on a simple principle: they generate warmth to melt snow and ice before dangerous buildups occur. These self-regulating or constant-wattage cables run along your roof’s edge and through gutters, creating channels for meltwater to drain safely.
Self-regulating cables automatically adjust their heat output based on ambient temperature—they’ll increase wattage when it’s colder and reduce output as temperatures rise. This makes them energy-efficient and safer.
Constant-wattage cables maintain uniform heat regardless of conditions, requiring thermostats for ideal control.
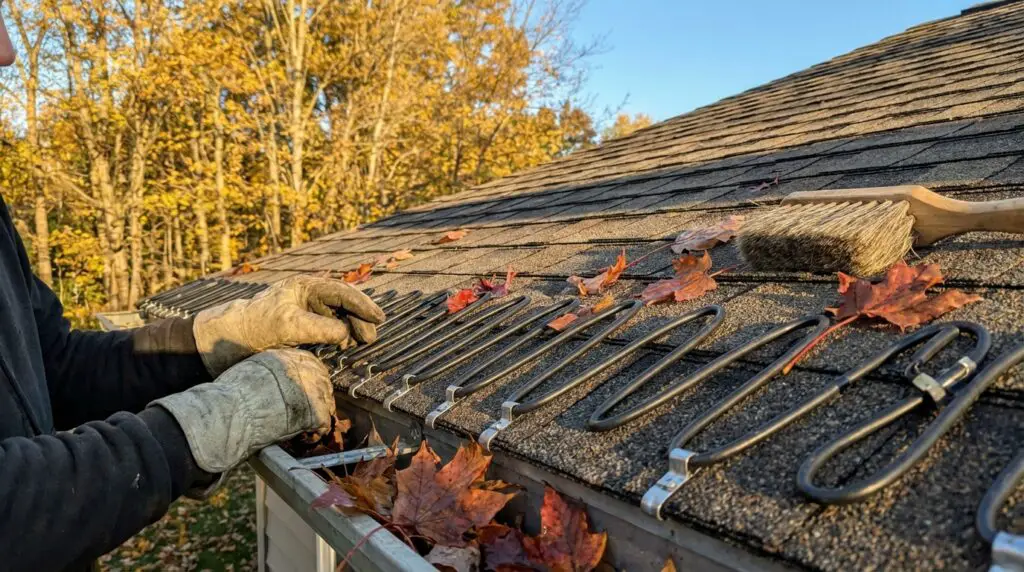
You’ll install these cables in a zigzag pattern along the roof’s edge, typically extending 12-18 inches above the exterior wall line. They’re connected to a dedicated electrical circuit and activated manually or through sensors detecting moisture and temperature drops.
Signs Your Home Actually Needs De-Icing Cables
Before you invest in a heated cable system, you should determine whether your home actually faces the ice dam conditions that warrant installation. Not every roof requires this intervention.
Not every roof needs heated cables—assess your specific ice dam risk before investing in a de-icing system.
You’ll benefit most from de-icing cables if you’ve observed these indicators:
- Recurring ice dams forming along your eaves after snowfall
- Icicles exceeding 12 inches hanging from gutters or roof edges
- Water stains appearing on interior ceilings or walls during winter thaws
- Low-slope roof sections where snow accumulates and melts unevenly
- Complex roof geometry with multiple valleys, dormers, or direction changes
- Inadequate attic insulation causing warm spots that accelerate snowmelt
- North-facing roof planes that receive minimal solar exposure
Document these conditions across multiple winters to confirm the pattern before proceeding.


Calculating Costs and Long-Term Value
Most homeowners spend between $500 and $1,500 on materials for a standard heated cable installation, with professional labor adding another $200 to $500 depending on your roof’s complexity.
Self-regulating cables cost more upfront but consume 50% less energy than constant-wattage alternatives.
You’ll want to weigh these expenses against potential damage costs. A single ice dam repair averages $3,000 to $5,000, while interior water damage restoration can exceed $10,000.
Factor in your annual heating cable electricity costs—typically $30 to $100 monthly during winter operation.
Calculate your break-even point by dividing total installation costs by your region’s average ice dam repair frequency.
If you’ve experienced ice dam damage twice in five years, quality heated cables often pay for themselves within two winter seasons.
DIY Installation Steps and Safety Considerations
While installing heated roof cables yourself can save hundreds in labor costs, you’ll need to prioritize safety before climbing onto your roof. Work only in dry conditions, wear slip-resistant footwear, and use a properly secured ladder with a spotter present.
Begin by measuring your roof’s eaves and calculating the cable length needed, including downspout runs. Mount clips along the roof edge in a zigzag pattern, spacing them 12-18 inches apart according to manufacturer specifications.
Route cables through each clip, ensuring consistent loops that extend 12 inches above the exterior wall line. Connect the weatherproof power supply to a GFCI-protected outlet.
Before permanent installation, test the system’s functionality. Secure all connections with weatherproof junction boxes and inspect cable routing to prevent pinching or abrasion points that compromise longevity.
When to Hire a Professional Installer
Although DIY installation works well for single-story homes with simple rooflines, you’ll want to call a professional when your project involves steep pitches, multiple roof levels, or complex architectural features.
Simple rooflines and single-story homes are DIY-friendly, but steep pitches and complex architecture call for professional expertise.
Heights exceeding 20 feet demand specialized fall protection equipment most homeowners don’t possess.
Hire an expert if your electrical panel requires upgrades or you’re uncertain about circuit capacity calculations.
Professionals also bring value when dealing with metal roofing, slate, or tile—materials that demand precise installation techniques to avoid damage.
Consider professional installation if your roof contains skylights, dormers, or valleys requiring intricate cable routing patterns.
Licensed contractors understand local building codes and can secure necessary permits. They’ll also guarantee their work, protecting your investment against installation defects that could lead to ice dam formation or cable failure.
Maintenance Tips for Maximum Cable Lifespan
Your heated roof cables will deliver reliable performance for 10 to 15 years when you commit to regular seasonal maintenance.
Before each winter, inspect the entire cable run for abrasions, cracks, or heat damage. Check all clips and fasteners for secure attachment, replacing any that show corrosion or loosening.
Clean debris from gutters and remove accumulated leaves that can trap moisture against cable insulation. Test your system before the first freeze by running it briefly and verifying even heat distribution along its length.
After winter, disconnect power and examine connections for water intrusion. Store controller units indoors if removable.
Document any wear patterns annually—this tracking helps you anticipate replacement needs before failures occur during critical weather events.