
7 Best Roof Installation Techniques for Steep Slopes
Did you know that improper shingle alignment can lead to leaks and reduced roof lifespan? When tackling steep roofs, it’s essential to master specific installation techniques to guarantee longevity and safety. From effective underlayment methods to proper nailing techniques, each step plays an important role. Let’s explore the best practices that can set your project up for success and help you avoid common pitfalls along the way.
Proper Shingle Alignment and Nailing Techniques
Proper shingle alignment and nailing techniques are crucial for guaranteeing a durable roof on steep slopes. To start, always follow the manufacturer’s offset guidelines to prevent leaks and guarantee everything aligns perfectly. You should align shingle edges with chalk lines for straight courses, maintaining consistent exposure measurements across all rows. When it comes to nailing, use six nails per shingle, especially on slopes over 21:12, and position them 5/8” above the butt edge for ideal wind resistance. For high-wind regions, increase nails to eight. Additionally, on very steep slopes, special application methods may be necessary to maintain roof integrity. Don’t forget to verify valley alignment by matching shingle corners to the centerline. Following these techniques creates a reliable roof, giving you peace of mind as you stand strong with your community.
Effective Underlayment Installation Strategies
When installing underlayment on steep slopes, starting at the eaves is essential for guaranteeing ideal protection and drainage. Lay down the lower edge first, making sure to position each sheet from the lowest to the highest points on sloped surfaces. This approach helps guide water away effectively. Don’t forget to maintain 4-inch overlaps between successive sheets, as this prevents any potential leaks. Using steel rollers will ensure a complete bond with the substrate, which is vital for durability. By taking these steps, you’re not just installing underlayment; you’re crafting a solid foundation for your roof. Proper underlayment significantly impacts roof performance, providing an extra layer of assurance against potential issues. In a community dedicated to quality, your choice of careful underlayment installation strengthens not only your roof but also your connection to others who value excellence.
Valley Construction Methods for Optimal Drainage
To guarantee ideal drainage in valley construction, employing the open valley method is a reliable choice. This technique trims shingles to expose the valley flashing, leaving it visible after installation. You’ll want to use a corrosion-resistant metal valley liner, ensuring durability and protection from wear over time. By installing two plies of mineral-surfaced roofing felt in the valley, you create a robust water barrier that enhances performance. This method not only improves drainage but also adds an aesthetic touch, making your roof stand out in the neighborhood. Proper coordination and detailing are essential for effective waterproofing in this construction method. Collaborating with skilled roofers familiar with these techniques can help you achieve the best results, ensuring your home remains a welcoming and safe space for years to come.
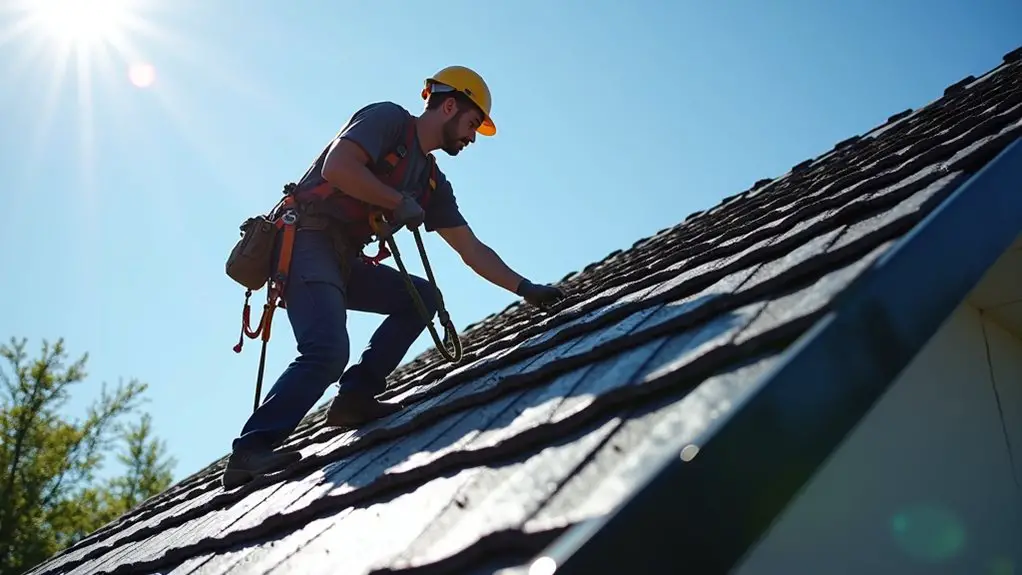
Safety Measures for Working on Steep Roofs
Safety measures are essential for anyone working on steep roofs, as the risk of falls and injuries increases considerably. Start with personal protective equipment (PPE) like roofing harnesses, non-slip footwear, safety helmets, cut-resistant gloves, and safety glasses. These items enhance your safety and allow you to focus on the job. Incorporate fall protection systems—install guardrails or use safety nets, and guarantee your anchor points are secured. Always inspect your equipment daily and choose stable setups like scaffolds. Monitor weather conditions to avoid working in dangerous situations. Remember, OSHA compliance is key; familiarize yourself with regulations. Additionally, it’s important to note that steep roofs have a pitch exceeding a 6:12 ratio, indicating a greater risk during work. By prioritizing these safety measures, you’ll foster a secure work environment, making everyone feel valued and protected on the job.
Best Practices for Steep-to-Low-Slope Transitions
Assuring safety on steep roofs is just the beginning; handling the intersection between steep and low-slope areas requires keen attention. Follow these best practices to guarantee a seamless shift:
Ensuring safety on steep roofs demands careful handling of transitions with low-slope areas to maintain integrity and performance.
- Extend low-slope membrane 18–24 inches vertically and 25–36 inches along the slope to prevent water backup.
- Maintain a minimum 2:12 slope on low-slope sections for effective drainage.
- Avoid vertical overlaps under 8–12 inches; they aren’t sufficient for protection against ice dams or wind-driven rain.
- Use reinforced membranes or cover boards when insulation exceeds 8 inches thick. Proper detailing is crucial to manage melt-water and ice dam potential.
Compliance With Manufacturer and Building Codes
Compliance with manufacturer and building codes is essential for successful roof installation on steep slopes. You must follow exact nail placements as per laminated shingle guidelines to prevent uplift, especially on slopes greater than 21:12. Adhering to offset alignment reduces leak risks and guarantees high-wind resistance. Always check for specific manufacturer requirements and slope-related warranty conditions via their approval portals.
You also need to meet local building codes, including OSHA safety protocols for slopes over 4:12. Utilizing UL-certified materials and securing necessary permits affirms your commitment to quality and safety. By completing manufacturer training and maintaining thorough documentation, you create a trusted environment that values craftsmanship and community standards, fostering a sense of belonging among your clients and peers.
Utilizing Hand-Sealing Adhesives for Enhanced Durability
When installing roofs on steep slopes, utilizing hand-sealing adhesives markedly boosts durability and performance. It’s crucial for various conditions, especially when the pitch exceeds 21:12 or temperatures drop below 50°F. Properly applying hand-sealing adhesives can make all the difference. Here’s what you should keep in mind:
- Use ASTM D4586-compliant roofing cement for ideal performance.
- Apply adhesive dabs at shingle tab corners to enhance wind resistance.
- Guarantee full coverage over factory sealants, particularly if bonds are broken.
- Consider seasonal timing for installation; warmer weather helps prevent shingle damage. Additionally, ensure to check for proper fastening before finishing the installation to avert potential issues.