
Window Insulation Film Installation-Cost Savings
Like Goldilocks searching for the perfect solution, you’ve probably tried various methods to keep your home comfortable without breaking the bank. Window insulation film offers a surprisingly simple answer to drafty windows and soaring energy bills. You’ll discover that this shrink-to-fit technique doesn’t require professional expertise or expensive tools. What most homeowners don’t realize is exactly how much money slips through their untreated windows each winter—and the numbers might shock you.
How Window Insulation Film Works to Reduce Heat Loss
Window insulation film creates an invisible barrier that traps a layer of air between the plastic and your glass pane.
This dead air space functions as an insulating buffer, dramatically slowing conductive heat transfer. Since still air conducts heat poorly, warmth stays inside rather than escaping through the cold glass surface.
You’re fundamentally adding a second glazing layer without the expense of replacement windows.
The film reduces convective currents that form when warm interior air contacts cold glass, then sinks and pulls more warm air toward the window. This cycle drives significant heat loss in uninsulated windows.
Window insulation film breaks the cycle of warm air rushing toward cold glass and sinking away, stopping a major source of heat loss.
When properly installed, the film also eliminates drafts from poorly sealed frames.
You’ll notice reduced condensation on glass surfaces, indicating the interior pane stays warmer and your heating system works less.
Tools and Materials Needed for Shrink-To-Fit Installation
Before you begin the installation process, gather all necessary tools and materials to secure a smooth, uninterrupted workflow.
You’ll need a window insulation kit containing shrink-to-fit plastic film and double-sided tape. Confirm you’ve got a tape measure for accurate window dimensions, scissors or a utility knife for precise cutting, and a hair dryer with sufficient wattage for proper shrinkage.
Keep a clean cloth and rubbing alcohol handy to prep your window frames—any dust or residue will compromise tape adhesion. A stepladder provides safe access to upper portions of larger windows.
Optional but helpful: a squeegee removes air pockets during initial application, while masking tape temporarily holds film in place during positioning.
Having everything within arm’s reach eliminates frustrating interruptions and confirms professional-quality results.
Step-by-Step Guide to Installing Window Insulation Film
Once you’ve gathered your materials and prepped your workspace, you’re ready to tackle the installation process.
Start by thoroughly cleaning your window frame with rubbing alcohol to guarantee ideal tape adhesion. Apply double-sided tape along the entire perimeter of the frame, pressing firmly to create a secure bond.
Don’t stretch the tape—let it adhere naturally to corners.
Unroll your film and cut it approximately two inches larger than your window dimensions. Beginning at the top, press the film onto the tape, working from center to edges to eliminate air pockets. Secure all sides before trimming excess material.
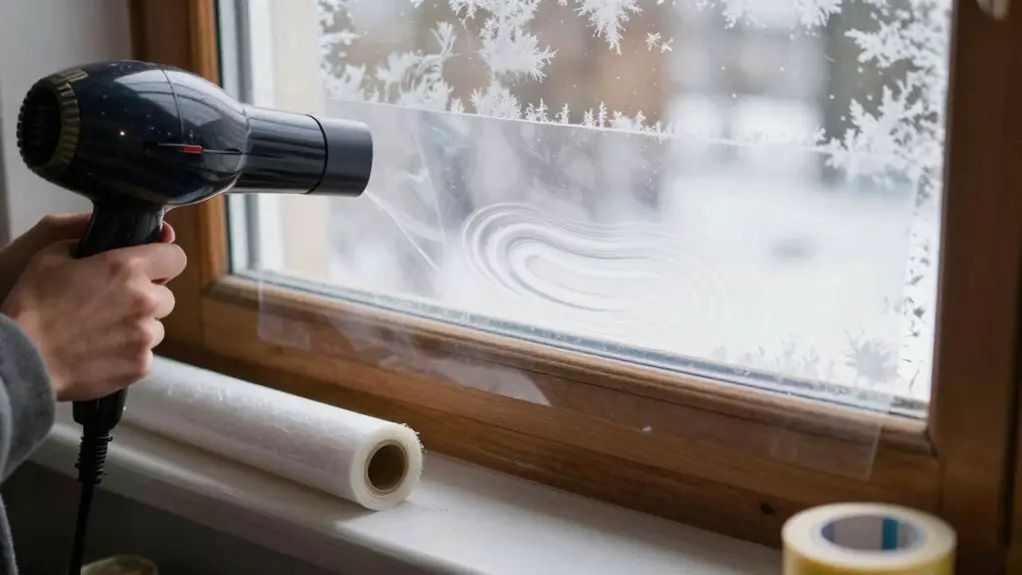
Set your hair dryer to high heat and hold it two to three inches from the film’s surface. Move in sweeping motions until wrinkles disappear and the film becomes taut.
Common Mistakes to Avoid During Application
Even with clear instructions, small errors can derail your window insulation film project and leave you with bubbles, peeling edges, or ineffective coverage.
Don’t skip surface preparation. Dust, oils, and moisture prevent tape from adhering properly, causing the seal to fail within weeks. Clean frames thoroughly and let them dry completely before applying tape.
Avoid stretching the film during positioning. This creates weak spots that tear when you apply heat. Instead, let the material hang naturally with slight slack.
Don’t overheat during shrinking. Holding your hair dryer too close or in one spot melts the film and creates holes. Maintain six inches of distance and keep the dryer moving constantly.
Finally, don’t rush. Working methodically prevents costly mistakes that waste materials and time.
Calculating Your Potential Energy Savings
After you’ve installed your window insulation film, you’ll want to know whether the effort was worth it—and the numbers can be surprisingly encouraging.
Start by calculating your baseline heating costs from previous utility bills during comparable months. Single-pane windows typically lose 10-15 BTUs per hour per square foot. Quality insulation film reduces this heat transfer by 25-50%, depending on the product’s R-value improvement.
Multiply your total window square footage by the BTU reduction rate, then convert to kilowatt-hours or therms based on your heating system. Compare this against your local energy rates.
Most homeowners recoup installation costs within one heating season. Track your monthly bills post-installation against your baseline data to quantify actual savings.
You’ll likely see 10-25% reductions in winter heating expenses.
Maintaining and Removing Window Film When Spring Arrives
Those energy savings you’ve tracked throughout winter won’t mean much if you damage your windows during the removal process or neglect basic film maintenance during the cold months.
During winter, inspect your film monthly for peeling edges or punctures. Reapply double-sided tape to lifting corners immediately—small gaps compromise the insulating air pocket you’ve created.
When spring arrives, remove the film methodically. Start at one corner and pull slowly at a 45-degree angle. This technique minimizes adhesive residue left on your window frames.
For stubborn tape remnants, apply rubbing alcohol with a microfiber cloth rather than scraping, which risks surface damage.
Store undamaged film flat between cardboard sheets for potential reuse. However, if you notice significant stretching or tears, discard it—compromised film won’t seal properly next season.