
How Do You Install A Shower Diverter?
Shower diverter valves are critical components for those with a combo bathtub and shower. These diverter valves are responsible for directing water flow between different water outlets or plumbing fixtures. However, many homeowners are unsure of how these diverter valves are installed.
When installing or replacing a shower diverter valve, the steps will vary depending on the type of diverter valve you’re currently using. While some diverters are installed in the tub’s spigot, others are installed in a faucet handle. Spigot diverters are easier to install than those in handles.
We’ll explain everything you need to know about installing a shower diverter valve. Once we’ve discussed why it’s possible to install a new diverter by yourself, we’ll outline the steps for replacing different types of shower diverter valves.
Can You Install A Shower Diverter By Yourself?
Shower diverters are necessary for showers with more than one outlet point. These divertersarecommonly used with a combo shower and bathtub, where the flow of water can be changed from the showerhead to the tub’s spout and vice versa. These handles are connected to a diverter valve, which directs the water flow.
However, diverter valves should not be confused with shower valves. Shower diverter valves are responsible for directing water flow between different outlets or fixtures. Shower valves are larger than diverter valves and cannot direct water flow. Shower valves turn the shower on or off and control the temperature.
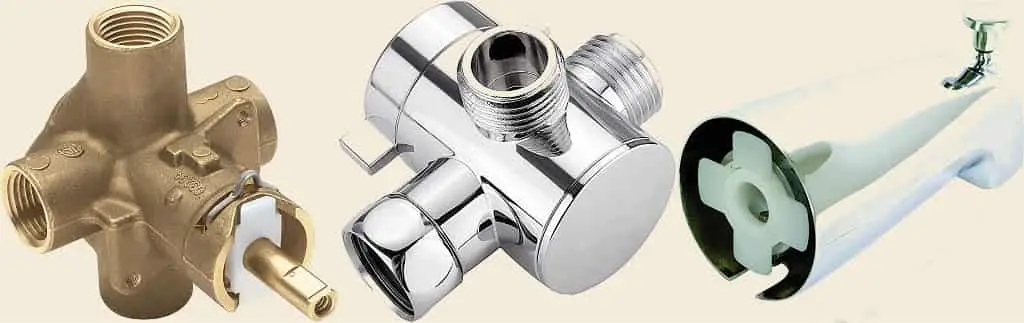
There are three main types of diverter valves. Three-valve diverters are located between the taps on a two-tap faucet, allowing water to flow to the showerhead or tub faucet. Two-valve diverters function similarly but have two L-shaped valves that control water flow. Two-valve converters are also found in the center of a faucet.
Tee diverters, also known as single-valve diverters, are installed in the bathtub spout. With these diverters, the water runs until the desired temperature is reached. When the water is at the right temperature, the diverter’s pull arm is pulled up, redirecting water flow to the showerhead.
Ultimately, the type of shower diverter valve you use depends on the type of faucet you purchased. The specific steps for installing a new diverter valve will depend on where it is installed: in the center handle behind the wall or in the tub spout/spigot. Luckily, we’ll explain the steps for each process in the following section.
Most homeowners can replace their shower diverter valves on their own. However, the correct steps must be followed when attempting this installation process. Once you’ve installed the diverter valve, you’ll be able to control the water flow between multiple fixtures.
How To Install A Shower Diverter Valve
The specific steps to install a new shower diverter valve will depend on where the current diverter valve is located. Overall, diverters located in a tub’s spigot/spout are easier to install than those located in handles and set back into a wall (such as three-valve diverters).
While we’ll break down the steps for replacing each type of shower diverter, you may find that these instructions do not perfectly match your shower’s design. If this is the case, you should not attempt the repair yourself. Instead, you should call a plumber to finish installing or replacing your diverter valve.
Installing A Shower Diverter Valve Located On Spigot Of Tub
If your shower diverter valve is located on your tub’s fixture, you can follow these steps to install a new valve!
Step One:Check How Your Spigot Is Attached
Firstly, you’ll need to verify how your spigot is attached to the bathroom wall. If the fixture is attached via a set screw, you’ll need to use a screwdriver or Allen wrench to unscrew this when removing the fixture. However, the fixture may be screwed onto the wall with threads at the end of the faucet, in which caseyou will need to remove the fixture with a plumber’s wrench.
Step Two: Unscrew Spigot From The Wall
Now that you’ve determined how your spigot is attached to the wall, it’s time to unscrew it. If you feel any resistance while unscrewing the fixture from the wall, you should halt your installation and call a professional plumber for assistance.
Step Three: Clean The Supply Pipe
Once you’ve unscrewed the spigot from the wall, you’ll be able to clean the end of the water supply pipe. You should inspect the supply pipe for any debris or gunk that needs to be cleaned. If your pipe is threaded, you should put some plumber’s tape on the end of the pipe.
Step Four: Install The New Diverter Valve
You’re ready to replace the spigot and diverter valve with your new spigot. This can be replaced by screwing the new spout onto the copper water supply pipe. If threads are used to attach the spigot to the wall, you’ll need to screw the pipe onto the threads of the supply pipe. However, if a set screw is used, you’ll need to use an Allen wrench to attach the new spigot to the pipe.
Step Five: Test The Shower Diverter
You can now test the replaced shower diverter to ensure everything works properly!
Installing A Shower Diverter Located In Handle
If your shower diverter valve is in a handle, you can follow these steps to install a new diverter valve!
Step One: Loosen The Screw On The Handle
Firstly, you’ll need to loosen the screw on center handle where the diverter is installed. With some handles, you may need to pop off the handle’s plastic button with a blunt knife.
Step Two: Remove The Handle
You can now remove the handle and inspect the diverter. If you find cement or grout inside the shower diverter valve when removing the handle, you should call a plumber for assistance in replacing the valve. Ultimately, you’ll need to chip the cement out of the wall if your diverter was cemented in,
Step Three: Remove The Diverter Sleeve
If your diverter doesn’t have cement around it, you can proceed to remove the sleeve positioned around the diverter valve.
Step Four: Use A Socket Wrench To Remove The Diverter
You’re now ready to remove the existing diverter valve using a socket wrench. When removing the diverter valve, you should ensure the nylon washer is removed with the diverter.
Step Five: Replace The Diverter And Handle
You’re now ready to replace the diverter with a replacement model. You should ensure you use the same make and model when replacing the diverter. If you can’t find the exact make and model of your current diverter, you’ll need to find one that is compatible with your shower. Once you’ve screwed in the new diverter using a socket wrench, you can replace the handle.
Conclusion
The steps to install a new shower diverter valve will depend on the type of diverter you’re currently using. Ultimately, diverters in a tub spigot are easier to replace than those in the handle of a faucet. Luckily, by following the correct steps, you can easily install a new shower diverter valve.