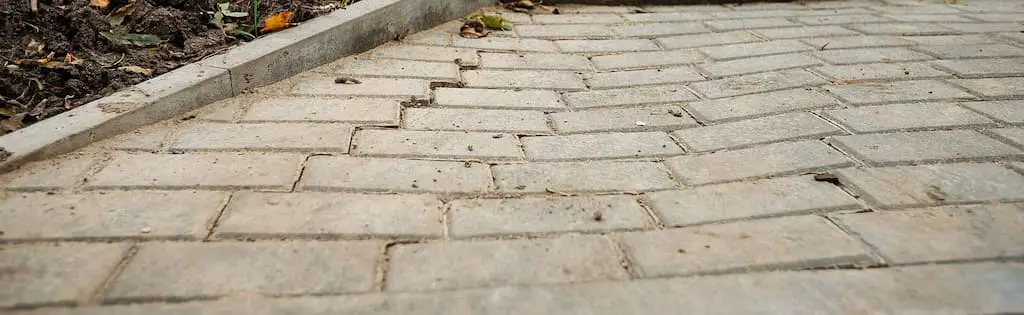
Some people have a misconception that paving slabs are immovable objects, but this is not the case. Instead, paving slabs shift and move as they settle into their final position in the ground. This can cause several problems for homeowners who want to stay on top of maintenance needs.
Your paving slabs may move due to sinking sand or stone, the heavy load your car exerts on them, frost heave, or improper installation. To solve these problems, consult with a professional to reinforce the slabs with concrete or asphalt, fix any present cracks, or replace the slabs completely.
This article will cover in detail the reasons your paving slabs might be moving and what you can do to solve the issue. Depending on the size of the project, it could be a quick DIY fix. But if the problem is extensive, it might be best to call a professional.
Why Do Paving Slabs Move?
Paving slabs move and shift as they settle into their final position in the ground. This is a natural process that happens with all paving materials, including concrete tiles. However, in some cases, uneven ground, heavy payloads, and extreme weather conditions can cause the slabs to move too far.
When properly installed, the longer your pavement remains unmoved, the more it will sink before settling to provide an even surface.
But if you didn’t take the time to ensure the surface was flat and compacted or account for the stress of holding cars, you may find your paving slabs are unable to stay put.
Let’s discuss in more detail a few key reasons why your paving slabs are moving:
Sand or Soil Displacement
In some instances, you may notice your slabs are sinking into the ground.
This sinking effect is due to a combination of gravity and the density of the soil at different depths below your slab’s base level.
Notably, if you place a weight on top of two surfaces—for instance, sand and stone—the heavier material (in this case, rock) would be forced down.
In contrast, the lighter one (sand) would remain unchanged or possibly rise due to displacement. This same principle applies when placing pavements.
Heavy Loads
Some paving slabs, especially 12×12 inch (30.48 x 30.48 cm), aren’t designed to withstand heavy loads. As a result, they are usually weaker and thinner and are generally too wide to withstand the weight put on them by cars all day.
Suppose you install such pavers. In that case, you may notice them moving over time because they’re compacted from the start.
Additionally, they’re made of soft materials, exacerbating this problem.
Frost Heave and Soil Conditions
Frost heave is another reason paving slabs move.
The process begins when moisture in the ground freezes and starts to push up the asphalt as it expands. This causes the paving slabs to break or pull apart at the seams.
The cracks created by this process allow more water to seep down into these crevices and the ground below. When this excess moisture freezes and expands, it causes even more pressure to build until a slab may pop out of its place.
Shifting Soil
What a lot of people don’t know is that the soil beneath their paving slabs can shift. This could be due to flooding or improper installation during which the soil wasn’t compacted right, or not given any access to drainage.
Just like water will expand when it freezes, soil will do the same until it dries out and contracts.
When this happens, the asphalt rises from its original placement when you step on it or drive over it with your vehicle (especially if you’re carrying heavy loads).
The resulting damage puts stress on both the paving slabs themselves and all the attached structures, including concrete curbs and metal fences.
Incorrect Installation
Quick installation without sufficient prep work is a common cause of paving slab movement.
It’s not uncommon for people to have slabs that don’t match up at the seams or with other paving slabs.
This is often due to incorrect installation of things like concrete edgings, metal fences, and curbs, leading to a whole host of problems, including slab movement and an unsafe environment for everyone who lives on your property.
How Do You Fix Moving Paving Slabs?
If you notice your paving slabs shifting or becoming uneven, there are a few things you can do yourself to try to fix the problem.
Here are a few ways to fix moving paving slabs:
- Install slabs correctly, including a compacted sub-base.
- Cut out the damaged slabs and replace with concrete.
- Remove broken pieces and fill with plaster, polyester resin, or grout.
- Add a layer of asphalt to the surface.
- Completely replace broken slabs.
These are quick fixes for smaller areas. If you notice the issue over the whole paved area, it would be best to hire a professional to assess the situation and suggest the most effective solution.
Install Slabs Correctly, Including a Compacted Sub-Base
To ensure your paving slabs stay put, it’s vital to install them correctly in the first place. Here a detailed step by step guide to installing paving slabs the right way, including:
- Preparing the site by digging out the whole area and thoroughly compacting the earth.
- Covering the entire area with concrete, not just directly under the slabs.
- Lightly wetting the slabs to prevent the concrete from drying before the slabs can settle.

If you want to prevent your paving slabs from moving in future installation projects, be sure that the depth of the site is no more than twice as deep as the depth of the tiles, and do not install pavers on slopes greater than 45 degrees.
Tip: Be sure to install a base of compacted gravel beneath the paving slabs so water can drain away from the slab surface. Doing this helps to reduce the effect of water on your paving slabs.
Cut Out the Damaged Slabs and Replace With Concrete
If the slabs are next to a wall, a quick fix may be achievable by cutting out the areas around the slab and adding some concrete with sand.
Add this mix into the empty space until you come close to level, then use epoxy paint or something similar to hide it permanently.
This should suffice if only one or two slabs need fixing and isn’t too much of a hassle for DIYers who don’t mind getting their hands dirty when there’s already concrete on site.
Remove Broken Pieces and Fill Them In
Alternatively, fix any cracks in your paving slabs to stop the movement.
A typical method of fixing a cracked slab includes taking out all the broken pieces and replacing them with patches made of plaster, polyester resin, or grout.
Plaster mixtures are tacky enough to produce an effective bond between concrete surfaces while being hard enough to withstand moderate amounts of load at later intervals.
Polyester resin is usually used when a stronger bond is needed, such as in installation over steel rebar.
New cracks can be effectively sealed by applying adhesive sealant material appropriate for that purpose (e.g., lightweight joint filler) and then filling these joints with either wet or dry aggregate gravel or sand.
Add a Layer of Asphalt to the Surface
Another way to fix the moving slab is to add a layer of asphalt to the top.
To add a layer of asphalt to the moving slab, follow these steps:
- Stabilize the slab by adding additional materials like asphalt, metal, or wood to ensure it’s level. You will need a trowel and blade for cutting through these materials.
- Apply adhesive sealant material appropriate for that purpose on top of this layer to fill any new cracks and gaps. In this case, I recommend this Liquid Rubber Concrete Sealant from Amazon.com. It’s easy-to-use, nontoxic, and ideal for indoor and outdoor applications.
- Fill the joints with either wet or dry aggregate gravel or sand, which would no longer allow the joint to move. Aggregate gravel is a blend of gravel, sand, crushed stone, slag, and recycled concrete which can be found in most home improvement stores.
- Apply a layer of asphalt on top of all materials, ensuring that it is level and fully compacted to help prevent future movement in the slab. Be sure to let the asphalt dry for at least 2-3 days before walking or driving over it, and remember it can take as long as 6-12 months to be fully cured.
Completely Replace Broken Slabs
If the slabs are beyond patch-work repairs or still moving after some time, you may need to remove and replace them entirely.
To replace moving paving slabs, follow these steps:
- Determine which way the subsoil is moving, which usually requires hiring a professional to come in and analyze your property.
- Cut slabs along this movement path so that they can be removed without having to dig down too deep – unless you need to address another issue like drainage or frost heave.
- Install a layer of gravel on the ground to provide drainage and discourage slippage.
- Fill in any gaps with pozzolan concrete (for a stronger cement mix) or mortar mix, and then install new paving slabs over them.
Final Thoughts
Paving slabs are often used to cover a large area quickly and efficiently, but they may move due to various factors such as sinking sand or stone, the high load your car exerts on them, frost heave, or improper installation.
There are a few at-home fixes for this, including adding concrete to reinforce the area or replacing slabs that are beyond fixing. However, if the site is extensive, it may be best to bring in a professional to ensure everything is done right.